Solar power generators are both cool and useful. With a DIY solar generator, you can power some of your home appliances throughout the day to cut down on your electricity bill. Or, you can build a DIY solar generator for camping, for running power tools out in your yard, or for just about anything else you might use a traditional gasoline generator for. Best of all, a solar generator can help keep your essential appliances running indefinitely (at least, during daylight hours) in case the power grid goes down for an extended period.
Building your own solar generator is much less expensive than buying a premade one, and it’s surprisingly simple even if you’re not much of a DIYer. In this guide, we’ll walk you through everything you need to know about how to build a DIY solar generator so you can start using the sun as your energy source.
The number one reason to go the DIY route when it comes to solar generators is cost. Name-brand solar generators cost upwards of $2,000, which eliminates nearly all of the cost savings you would get from using the sun for energy rather than gasoline or the electric grid. By comparison, you can build a custom DIY solar generator for less than $500.
Another reason to build your own power unit rather than opt for a packaged model is that you can customize it to meet your needs. Want a built-in light, high current ports, USB outlets, or another custom feature? You can add that into your DIY solar generator.
Building your own solar generator also means that you know what all the parts are and what they do. This is important since it allows you to maintain your generator over time and replace parts as they go bad. Whereas you might have to scrap a $2,000 premade solar generator when the panels start to fade, for example, you can simply replace that part on your DIY unit and keep on producing power.
Of course, there’s one more big reason to go the DIY route – it’s fun! Whether you’re a seasoned DIYer or a novice to electrical diagrams and wiring, building a DIY solar generator is a relatively straightforward and highly rewarding project.
Picking out the parts that you’ll use to build your solar generator is one of the most exciting parts of this project. There’s a lot of leeway to customize components to fit your vision, so feel free to look for alternatives to the components we’ll suggest.
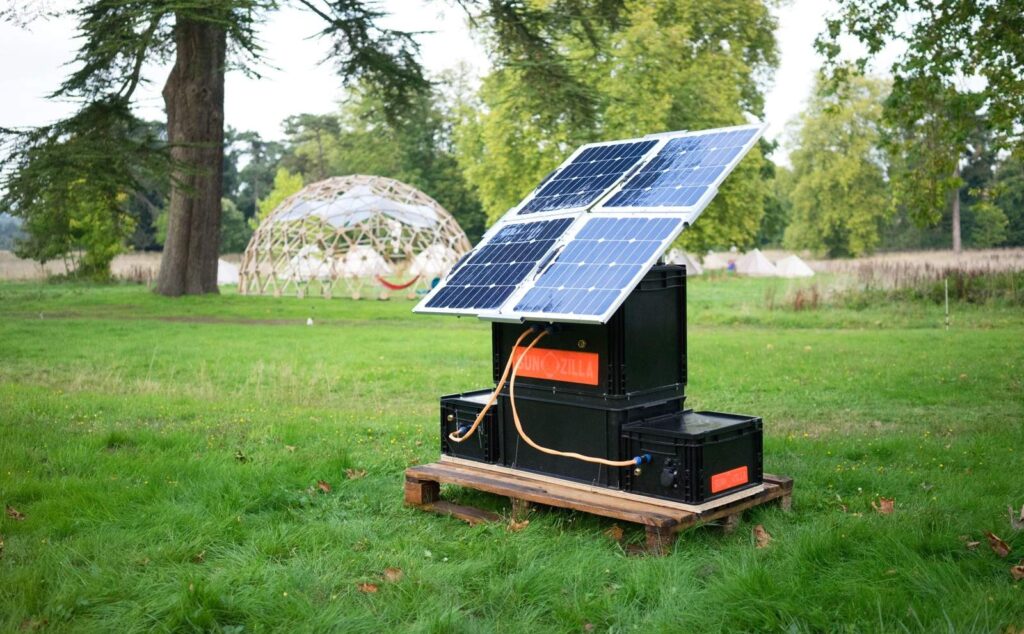
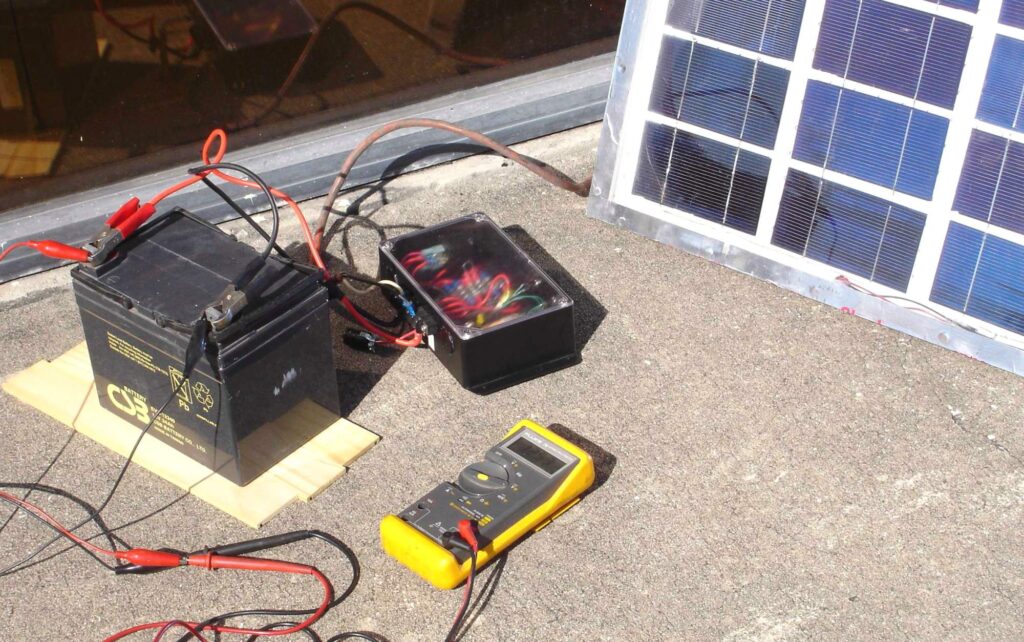
The first thing you need is a case to build your solar generator in. This is essential to making your solar generator portable, allowing you to protect it from bad weather by moving it inside, take it camping, or to move it around your home to follow the direct sunlight. You could use a large plastic container from your local box store, which would be extremely cheap – and many models are mounted on wheels. If you’re worried about protecting the internal components, consider something a bit more heavy-duty like a Pelican case or a sturdy suitcase.
Next, you need a power inverter. Solar panels produce DC power, but most of the appliances and electronics in your home run on AC power. The wattage of your power inverter is important, since you want to have enough wattage to use all of the power that your solar panels can produce. Unless you’re using multiple panels, a 2,000- or 3,000-watt inverter should work well.
Of course, you’ll also need to pick out your solar panel. There are a ton of options and different panel materials, each with their own advantages and disadvantages. For a 2,000- to 3,000-watt inverter, you’ll want to look for a panel that produces about 100 watts. If possible, look for a kit that includes not just a solar panel, but also a solar battery charger and wiring cables.
The last major component you need is a battery. Ideally, look for a deep cycle battery that can be discharged repeatedly without reducing its lifespan. Importantly, your battery should also be able to be used in any orientation, since your portable solar generator may be used when it’s laid down or stood upright.
In addition, there is a variety of smaller components that you’ll need to build your DIY solar generator:
These components just cover the basics for building your own solar generator. You can also customize your design and add LED lights, additional outlets, and a voltmeter. Adding these is relatively straightforward – just make sure you buy a large enough fuse block and extra electrical wire.
Now that you’ve assembled your components, let’s walk through how to build a DIY solar generator.
Okay, now that you’ve got all the components mounted, the next part of our DIY solar generator instructions is all about wiring.
That’s it! At this point, you should be able to activate the charge controller on and start collecting sunlight to charge your battery.
Whenever you’re dealing with electricity, safety is paramount. The main thing to keep in mind when wiring your DIY solar generator is that even if you’re not collecting energy, the battery is live throughout the process – treat it as such. It’s important not to allow wires to inadvertently touch each other once they’ve been connected to the battery.
One thing to keep in mind is that most solar inverters are designed to be connected to the grid to operate. When the grid goes down, your inverter won’t operate. This is an important safety feature – if you continued to supply power to your home when the grid is down, you could backfeed the power lines and endanger utility workers trying to fix them. If you want to run your solar generator when the power grid goes down, you’ll need to hook your generator up to a transfer switch just as you would for a gasoline-powered generator.
[vc_tta_accordion style=”modern” color=”green” active_section=”1″][vc_tta_section i_icon_fontawesome=”fa fa-comments-o” add_icon=”true” tab_id=”1581895772781-c6818729-d70d” title=”How big a solar generator system should be to power my home?”]How large a solar generator system needs to be depends on what you’re trying to power. The system we described is designed to handle up to around 2,000 watts – that’s enough to power your lights, refrigerator and freezer, and a few other small appliances. If you want to power your whole house via your solar generator, you’ll need a system that delivers 5,000 watts at the very least. In this case, you will need a larger inverter, additional outlet panels, and more solar panels.[/vc_tta_section][vc_tta_section i_icon_fontawesome=”fa fa-comments-o” add_icon=”true” tab_id=”1581895772826-d9db3600-c49e” title=”Will I get energy from a solar generator in winter?”]Yes, your solar generator can deliver power anytime the sun is shining – regardless of the temperature outside. That said, the days are shorter and light less available, so you will likely see a drop in power delivery. If it gets very cold, you might also lose efficiency in your battery. The good news is that the delivery of your solar panels actually increases as it gets colder outside.[/vc_tta_section][vc_tta_section i_icon_fontawesome=”fa fa-comments-o” add_icon=”true” tab_id=”1581895817747-b9b8cc8f-79a8″ title=”Do I need any permits to build the system?”]You don’t need any permits to build your own solar generator. The only situation in which you would need a permit is if you wanted to permanently mount the solar panel on your home. But, in that case, your generator would no longer be portable and you’d have to be very careful about weatherproofing your design.[/vc_tta_section][/vc_tta_accordion]
Building a DIY solar generator is an inexpensive, easy, and fun process. It’s easy to customize the build to produce as much power as you need, add custom outlets, or make the generator more or less efficient.
The benefit of a solar generator is that you can use the sun’s energy to dramatically reduce your electricity bills. If you add a transfer switch to your design, you can even use your DIY solar generator to power your home indefinitely when the grid goes down.